Are your team members forced to sift through a long list of requests to find the ones that fall within their scope? Do they have to open every ticket individually to determine priority and decide which one to tackle first?
Without well-structured Zendesk views, you may be wasting resources on sorting and filtering tickets rather than focusing on swiftly resolving customer issues. This disorganization can be overwhelming, contributing to your team’s burnout.
Top-tier support teams leverage a Zendesk views to filter tickets into manageable buckets for focused attention and easy prioritization. When you're handling a consistently high volume of tickets, enabling your team to focus is key to boosting productivity.
Read on for an overview of Zendesk's default views and tips for building custom views that can supercharge your customer service team's efficiency.
Understanding Zendesk Views
Zendesk views enable support teams to categorize tickets based on specific criteria, making it easier for support agents to navigate all incoming requests. As a result, it helps streamline response and resolution times, leading to improved operational efficiency and an enhanced customer experience.
Tickets can be grouped based on various factors such as ticket channel, tags, status, priority, language and more.
There are three types of views available in your views list:
Standard views – pre-set views provided by Zendesk by default.
Custom shared views – folders that you can create and share across your team(s).
Personal views - individual buckets that users can create to align with their unique needs and preferences.
It's common to use a combination of standard and custom views to help manage ticket workflows. For instance, you might have your most senior agents prioritize an SLA-target view, then shift their focus to a VIP customer view before moving over to more general tickets.
Standard Zendesk Views
Zendesk Support offers a range of default views right out of the box to boost your team's productivity. You'll see these in your views list the very first time you open up Zendesk.

These standard views include:
Your unsolved tickets: All tickets with less than solved status that are assigned to the agent accessing the view. Often, this is the primary view agents use to work on their assigned tickets.
Unassigned tickets: All new and open tickets that have not yet been assigned to a specific group or agent. This view is useful for agents to select their next ticket if there are no automatic assignment rules in place. It also helps catch tickets that may have slipped through without assignment.
All unsolved tickets: All tickets with less than solved status that still require an action from your team or the customer. This view provides the overall ticket volume your team has to tackle at any given time and can help in managing their capacity.
Recently updated tickets: Open tickets that have had interactions from customers or your team in the last 24 hours.
New tickets in your groups: Open tickets assigned to one of your groups which haven’t been assigned to a specific agent yet.
Pending tickets: Tickets awaiting updates from customers. Regularly checking this view and following up with unresponsive customers cis great for enhancing your customer experience.
Recently solved tickets: All solved tickets starting from the most recently solved. Quality assurance teams typically use this view in their work if they don’t have a dedicated QA tool to pull tickets from.
Unsolved tickets in your groups: Open tickets assigned to one of your groups which have been assigned to an agent. If your team is small and does not heavily rely on Zendesk groups, you will probably find these group-specific views unnecessary.
While these standard views can be a solid starting point and be sufficient for small teams with low ticket volume, additional custom views tailored to your team's specific needs can greatly improve the workflow efficiency.
Custom Zendesk Views
Zendesk is quite flexible when it comes to creating custom views. The only restriction is that by default, only up to 30 shared and 10 personal views are displayed in the left-side menu. Ideally, you won’t need more than these anyway to ensure that everyone can easily navigate to what they need and avoid overwhelming agents with too many views.

Any Zendesk Administrator on your account can create custom views in Zendesk's Admin Center, based on items ranging from ticket status, key ticket fields, Zendesk groups, or more. To add (or edit) views, open up Admin Center, then click Workspaces in the sidebar, then select Agent Tools, then Views.
Or you can simply search for views within the sidebar.
Let's explore common use cases for Zendesk custom views along with some unique real-life examples that can serve as inspiration for setting up your team’s views.
1. Zendesk Views by SLA Targets
To ensure service alignment with your Service Level Agreement (SLA) targets, you can create a structured view system visualizing the SLAs. This approach helps agents prioritize items that require immediate attention.
For instance, if your SLA mandates a 24-hour first response time for all ticket types, you can establish the following view system:
Safe SLA (for tickets created less than 16 hours ago)
Will be overdue within 8 hours
Will be overdue in less than 2 hours
Already overdue
The system is most helpful for Software-as-a-Service (SaaS) and professional services firms which operate under strict SLAs. If that's you and your team is handling thousands of tickets each month, SLA-focused views can be a critical part of delivering on your promises to your customers.
To set up these views, pick the "Hours since created" filter and set the appropriate number of hours in accordance with your team's SLAs. You can order tickets in ascending order based on the request date within each view, enabling agents to tackle older tickets first, safeguarding the business against any SLA breaches.

2. Zendesk Views by Language
For organizations with multiple teams or team members handling inquiries in different languages, structuring views based on ticket language can be the best option. Here is an example list of such views:
English – Unassigned
German – Unassigned
Spanish – Unassigned
Other – Unassigned
To deliver exceptional multilingual support with Zendesk, create these views by using the language filter within the view settings.
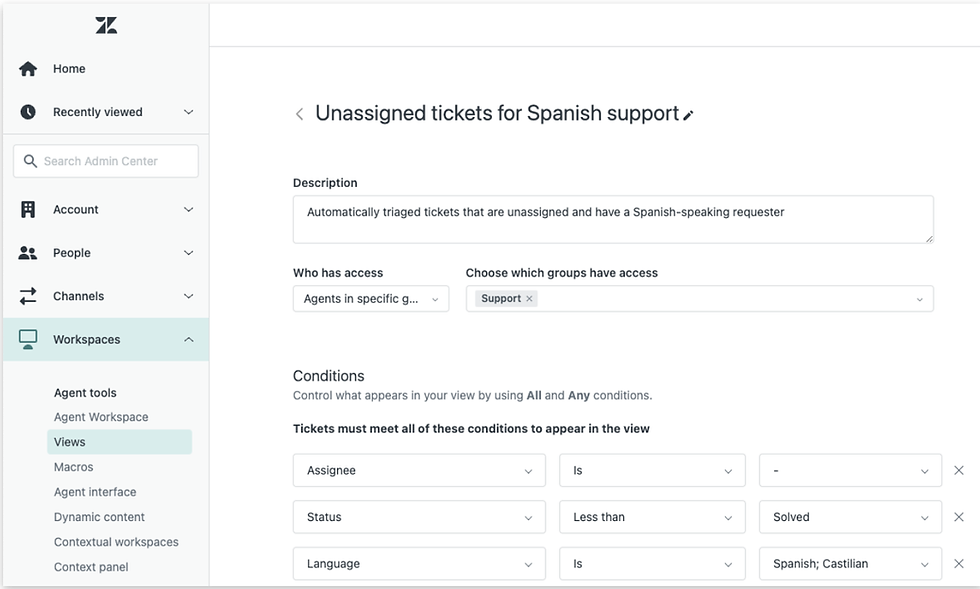
Zendesk may not always accurately detect the language, so setting up a catch-all view (see below) can be a good idea for tickets with undetected language or detected languages that you don’t support.

Alternatively, regularly reviewing the default Unassigned tickets view can help identify any tickets that may have slipped through the cracks.
3. Zendesk Views by Brand
When managing support for multiple brands under one Zendesk roof, custom views based on the brand can help with efficiency. Your view structure may be as follows:
Brand name A – Unassigned
Brand name B – Unassigned
Brand name C – Unassigned
To set up these views, filter tickets based on their Brand value.

For larger multi-brand and multi-language teams, it can be practical to further segment these views into more manageable buckets. You can have Brand as a higher-level criterion and create multiple views for each brand based on their detected language. For example:
Brand name A – English Unassigned
Brand name A – German Unassigned
Brand name B – English Unassigned
Brand name B – German Unassigned
Be sure to regularly review the default Unassigned tickets view to catch any tickets that didn’t get a brand of language correctly assigned or detected to ensure that no ticket goes unanswered.
4. Zendesk Views by Region
When managing a support team across various regions, organizing views based on those regions can empower regional managers to effectively monitor their respective support teams.
Support teams for different regions often utilize local email addresses like support@company.de, support@company.ca, support@company.uk.com, etc. The regional views can be configured based on these email addresses using the Received at filter.
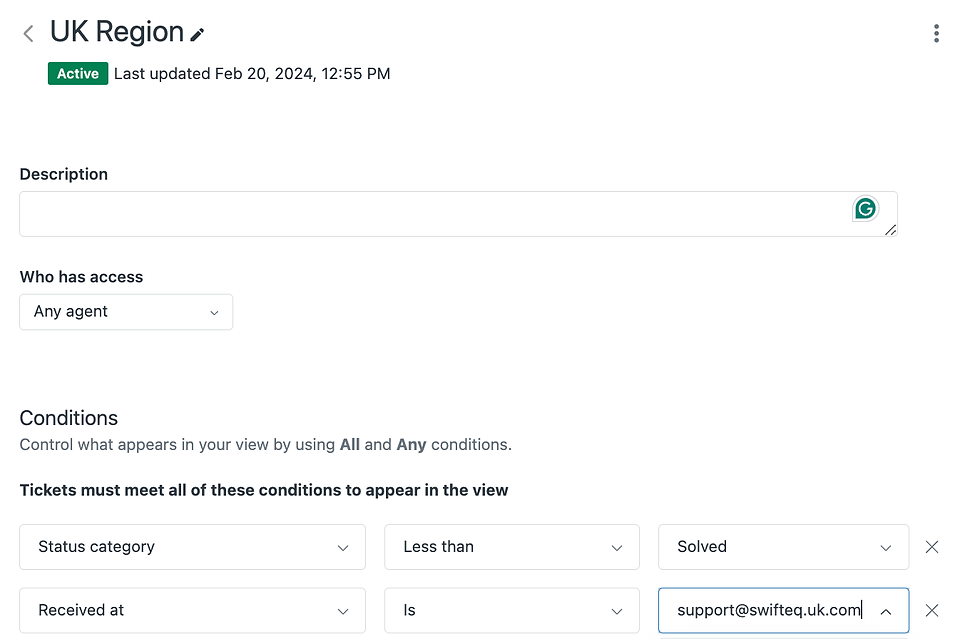
You have the option to create views for Unassigned tickets as shown in previous examples, or create buckets for all unresolved tickets per region – which works great for smaller teams with lower ticket volumes. Grouping tickets by assignee within each view can streamline navigation and collaboration among team members working from the same ticket pool.

5. Zendesk Views by Channel
Grouping tickets by channel is ideal if you’re allocating resources differently per each support channel, for example if you want agents to prioritize social media conversations over emails. Separate views would allow support team members to tackle social tickets from the dedicated view first, before attending to emails.
To group tickets based on channel, create views using the Channel filter. You can set the Status category filter to be less than solved to include all unsolved tickets, or set it to less than pending to include only new and open tickets in each view.

6. Zendesk Views by Customer Value
If your business offers varying service levels depending on customer subscription type or value, creating custom views tailored to each customer segment can help your team’s prioritization process.
In SaaS, this segmentation can be centered around subscription tiers or Monthly Recurring Revenue (MRR) categories. For instance:
Trial accounts - Unassigned
Standard accounts - Unassigned
Premium accounts - Unassigned
In the e-commerce sphere, ticket allocation can be based on the value of the customer's order(s).
To configure these views effectively, you'll need to send the date about subscription type or customer value data from your payments or reporting tool to Zendesk and appropriately tag customer profiles. The views will be structured around ticket tags in this case.

7. Zendesk Views by Tier
For teams with diverse agent roles, where tier 1 agents handle initial ticket resolutions before escalating to tier 2 or specialized departments, organizing tickets into buckets based on their tier level can streamline workflow.
By creating separate views for each tier team, you enable efficient handling of tickets at different stages and gain visibility into the workload of each tier to pinpoint any potential bottlenecks.
If your team members are assigned to Zendesk Groups based on their Tier, you can easily create tier-based views with the group filter.

8. Zendesk Views by Team
If your organization has multiple internal teams handling their inboxes via Zendesk, structuring ticket views based on the responsible department can significantly improve operational efficiency.
The view settings can be configured based on the group, similar to the previous example, or organized according to the email address to which each ticket is sent, such as hr@company.com, support@company.com, sales@company.com, and so on.

9. Zendesk Views by Priority
For teams focusing on managing ticket volume based on the urgency and priority of requests, creating a dedicated view for high-priority and urgent tickets is essential to address these tickets first before the team moves on to other views.
If you have a triage team or specialists responsible for manually assigning priority, the view can be simply based on the Zendesk Priority field.

Otherwise, you should filter based on the criteria you use to define ticket priority and urgency. There are multiple ways to do this:
You can flag urgent tickets based on keywords in the ticket description (e.g., urgent, ASAP or other specific phrases) and set the priority.
You can set ticket priority based on the requester, with larger accounts receiving the highest priority.
You can use an app like Ticket Parser to automatically extract data from your ticket comments and autofill ticket fields, enabling more accurate prioritization.
10. Zendesk Views by Topic
If your support team specializes in specific product areas of processes, organizing tickets by topic can be ideal. This approach is common for SaaS teams supporting complex platforms, where agents can achieve greater results by focusing on specific use cases or features within the platform.
Depending on how you track ticket topics or related product areas, the view can be based on ticket tags or other fields. Tools like the Triggers+ChatGPT app can even use AI to tag tickets for you automatically, removing the need for manual tagging.

11. External Escalations View
Sometimes support has to escalate tickets to external teams, for example sales or marketing. Typically, those teams have a slower response time as they don’t actively work with user queries day in and day out.
If your escalation process involves assigning tickets to external teams in Zendesk, a separate view for external escalations will help clean up other support views from tickets requiring an action from an external team.
To set this up, create a macro for external escalations with a specific tag and configure your view based on that tag (see example above).
12. Low-Rated Ticket View
Setting up a view specifically for low-rated tickets enables you to track any bad feedback from your customers. Being able to identify these tickets immediately is a perfect tool for spotting service imperfections and improving your overall customer experience.
For this view to work, you’ll need to have Zendesk CSAT enabled. Once enabled, filter tickets based on a Bad or a Bad with comment Satisfaction value in the ‘Tickets can meet any of these conditions…” section of the view settings.

13. Leaderboard Zendesk Views
A unique real-life example you can draw inspiration from is using Zendesk views as a leaderboard to enhance agent accountability by giving them high visibility on their peers' performance.
To implement this, set up individual views for each agent (or group of agents), showcasing the total number of tickets they have resolved.

If you consider setting up such a leaderboard like this, ensure robust quality assurance processes are in place. Focusing solely on the quantity of tickets solved, you can risk compromising the service quality.
14. Catch-All Zendesk view
Ideally your views are mapped to effectively cover the entire ticket volume. However, it's not uncommon for tickets to get lost in the shuffle and pop up when least expected simply because they weren't included in any of the views.
Creating a catch-all view can help prevent these ticket black holes. To create this view, filter tickets based on status and time since last update.

Sort the view in ascending order based on the ticket ID or last updated date for the oldest unsolved ticket to always show up at the top of the view. It will help you to quickly identify and address any overlooked tickets, ensuring that no customer concern goes unresolved.

Personal Zendesk views
While shared Zendesk views are great for improving productivity, too many of them can overwhelm agents and lead to them missing critical information.
For instance, a shared view based on the group assigned would always show zero tickets for agents without access to that group – cluttering their screens and not adding any value. Creating views accessible exclusively to agents within that specific group is a more effective approach in this case.

Many users also find it beneficial to set up personal views tailored to their individual needs.
For example, product managers configure personal views based on ticket tags related to different product areas, feature requests or bug reports – to review them directly while keeping support agents' screens clean and allowing them to focus on what matters most.

Boost Support Operations with the Right Views and Tools
Zendesk is constantly evolving and enhancing its features to empower support teams in maximizing their efficiency.
Zendesk has said that improvements to views will be coming soon, including additional filters and the ability to sort and categorize them. If you haven't already, I highly recommend keeping an eye on these developments to stay informed.
In the meantime, there's also a vast library of Zendesk apps available which can bridge gaps in native functionality and significantly enhance your support team's performance while Zendesk continues to evolve.
By utilizing Swifteq’s Automation, Help Center and Agent-Assist apps, you can boost the efficiency of your Zendesk operations and enable your customer support team to achieve more with less.
Start a 14-day free trial of any Swifteq app today to eliminate common Zendesk pain points and make your customer support team more efficient.
Written by Maryna Paryvai Maryna is a results-driven CX executive on a mission to champion efficient and human-centric customer support. With a deep-rooted passion for well-structured documentation, she firmly believes that exceptional customer experiences lie at the heart of every successful business. |