Summer 2025 Round-Up - Swifteq Product Updates
- Sorin Alupoaie
- Aug 6
- 6 min read

Updated: Aug 11

As you already know, here at Swifteq, we constantly update and improve our apps in order to answer our customers' requirements and better serve their needs.
Here are the improvements we made this summer:
Automatically Update the Requester on a Zendesk Ticket with Ticket Parser Autofill.
Edit Glossary in Help Center Translate.
Add and remove labels in bulk in Zendesk Guide with Help Center Manager.
Change permissions in bulk for Zendesk Guide articles with Help Center Manager.
Bulk Edit Image Alt Text in Zendesk Help Center with Help Center Manager.
Export Zendesk Knowledge articles in separate files with Help Center Manager.
How to Automatically Change the Requester in Zendesk Tickets
Managing post-purchase communication can get messy, especially in e-commerce environments where order confirmations and status updates flood your Zendesk inbox from “no-reply” email addresses.
While these notifications are useful, they create a frustrating challenge for support agents: how to respond directly to the actual customer when their email isn’t the one associated with the ticket?
That’s where the Ticket Parser Autofill App comes in - automating what’s often a slow and repetitive manual process.
When a support agent tries to respond to a ticket that comes from a no-reply address he ends up doing the following:
Manually scanning the order details to find the customer’s email.
Adding the customer as a user in Zendesk.
Manually changing the requester on the ticket.
It works, but it's incredibly inefficient—especially when dealing with dozens (or hundreds) of similar tickets each day.
The Ticket Parser Autofill App eliminates this repetitive work by automatically extracting the customer’s email from the ticket content and updating the requester field for you.
Here’s how it works:
1. Install the app from the Zendesk Marketplace You’ll find the Ticket Parser Autofill app ready to integrate into your support workflow.
2. Create a new workflow Let’s name it Change Requester. This workflow should be triggered whenever a new ticket is created.
3. Define what to extract In this example, we want to extract the customer’s email address from the first message in the ticket (i.e., the ticket description). The app uses pattern matching to detect a phrase like:
Buyer Email: customer@email.com
Just configure the app to find “Buyer Email:” and capture the email address that follows.
4. Test the extraction The app includes a built-in test tool so you can ensure it’s grabbing the correct email before going live.
5. Set the extracted email as the requester Once the app correctly pulls the email, configure it to automatically update the ticket requester using the extracted value.
6. Enable the workflow Activating the workflow also creates a Zendesk trigger that runs it every time a ticket is created.
7. Add optional filters You can fine-tune the setup—for example, only run the workflow if the email is from known automated sources like Amazon or Shopify.
Edit Glossary in Help Center Translate
You can now edit your translation glossary directly inside the app — no more uploading and downloading every time you need to make a small change.
The glossary tells the translation engine how to handle specific terms or phrases.
For example:
If your brand is called “Florals Online”, you might want that name never to be translated.
Or you may want “Special Rose” translated in a certain way in specific languages.
Previously you had to upload your glossary (a CSV file) in the Settings page.If you needed to make changes:
You had to download it, edit it manually, and then upload it again.
This was time-consuming and inconvenient.
Now:
You can simply click the “Edit Glossary” button inside the app.
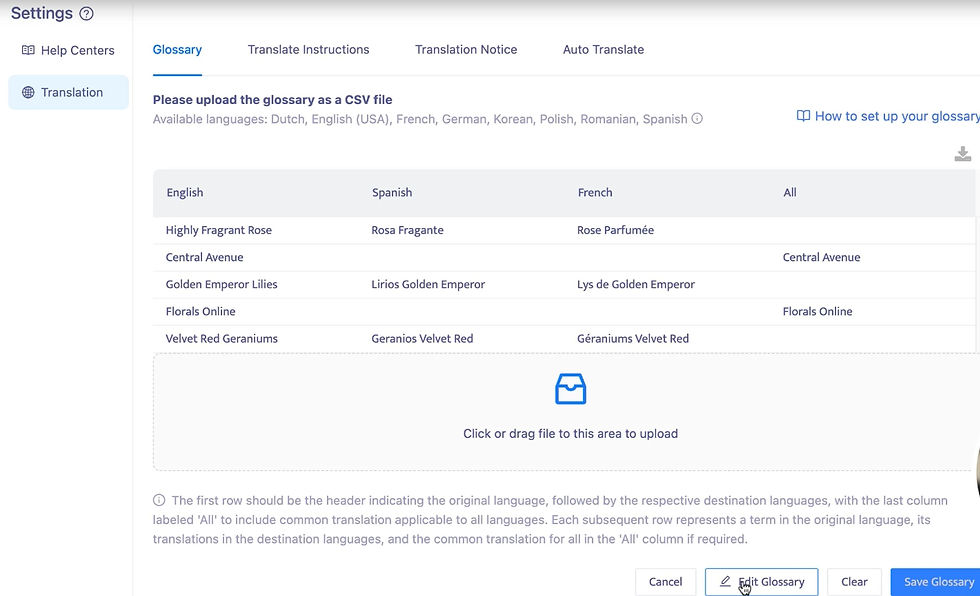
This takes you to a dedicated Edit Glossary page where you can add new terms, edit existing entries, add new languages, or choose which terms should not be translated.
Such a capability makes managing your translation rules faster, easier, and more flexible, especially when dealing with brand-specific terms or custom language preferences.
How to Add and Remove Labels in Bulk in Zendesk Guide
If you manage a large Help Center, you know how time-consuming it can be to update labels across hundreds of articles. Zendesk Guide only lets you select 30 articles per page — which works for small updates, but not for big ones.
Now, with Help Center Manager, you can do this in bulk.
Here’s how:
Set your Filters to narrow down the articles you want to update.
Select all articles from the filtered list.
Click “Bulk Actions” → “Change Labels.”
Choose “Remove these labels” (if needed).
Add any new labels you want to apply.
Click “Save.”

The changes are applied in under a minute. Once done, you can view the full list of updated articles.
How to Change Permissions in Bulk for Zendesk Guide Articles
Here’s how it usually works in Zendesk Guide. You can only update permissions for 30 articles at a time.
You must:
Select 30 articles
Click Article Settings
Choose Change Permissions
Select either Management or Viewing
Click Save
If you have hundreds or thousands of articles, you’ll need to repeat this for every 30 articles, page by page.
Now, here’s how it works in Help Center Manager:
Select the articles you want — or just select all articles.
Click on Bulk Actions → Change Permissions.
Choose whether you want to update Management or Viewing permissions.
Select the specific permission you want to apply.
Click Save.

It might take a moment, but all selected articles will be updated at once, saving you hours of manual work.
How to Export Zendesk Knowledge Articles in Separate Files
Now, Help Center Manager makes it easy to export your articles individually, perfect for sharing, printing, or uploading content one piece at a time.
Instead of getting one long, combined file like before, you now get a ZIP file with each article in its own PDF, Word, or HTML document.
Here's how it works:
Open Help Center Manager Navigate to your knowledge base area inside Help Center Manager.
Click the “Export” Button You'll see this option in the top bar.
Select the Articles You Want to Export Pick one or more articles from your list.
Choose Your Export Format Available formats:
CSV
HTML
PDF
Word (.docx)
Enable the “Separate Files” Option (New Feature) For PDF, Word, or HTML formats, you can now export each article into a separate file - all in one go.

Receive the ZIP File via Email Shortly after exporting, you’ll get an email with a download link to a ZIP file. Inside: each article is saved as its own individual file Article 1, Article 2, Article 3, and so on.
How to Bulk Edit Image Alt Text in Zendesk-powered Help Centers
If you're using Zendesk Guide or Knowledge Base, updating alt text for many images is difficult and time-consuming.
Here’s why:
You have to check each article manually to see if any images are missing alt text.
Then, for each article:
Open it in the Editor.
Switch to the source code view.
Find the image and add the alt text manually.
Click Apply and then Save.
Repeat this process for every image, in every article — potentially hundreds of times.
With Help Center Manager, you can add or update alt text in bulk.
Here's how:
Step 1: Filter Images Without Alt Text
Open Help Center Manager.
Click Add Filter → Select “Alt text” → Choose “Not present”.
This shows you all images missing alt text.
Step 2: Select the Images
Select all the listed images that have no alt text.
Step 3: Click “Change Alt Text for Images”
You’ll see two options:
Generate with AI
The system will create alt text automatically.
You can also enter a default fallback alt text (in case AI fails).
Optionally, skip images that already have alt text.
Use the same alt text for all images
Ideal for logos or repeated design elements.
Step 4: Apply Changes
In this example, we choose “Generate with AI” and add a fallback text.
Click Change Alt Text.
Within seconds, alt text is added to all selected images.
Step 5: Verify the Update
Reload your Help Center.
You’ll see that every image now has alt text — no manual editing needed.
There you have it, our complete list of Swifteq's product updates for the summer of 2025.
Looking to uplevel your Zendesk support performance. Check our apps or schedule a free demo.

Written by Sorin Alupoaie
Sorin Alupoaie is the founder of Swifteq, an experienced software technologist and entrepreneur, he loves shipping products that solve painful customer problems. Sorin strongly believes that any Customer Service interaction represents a huge opportunity for a business to listen and improve how they deliver value to customers.